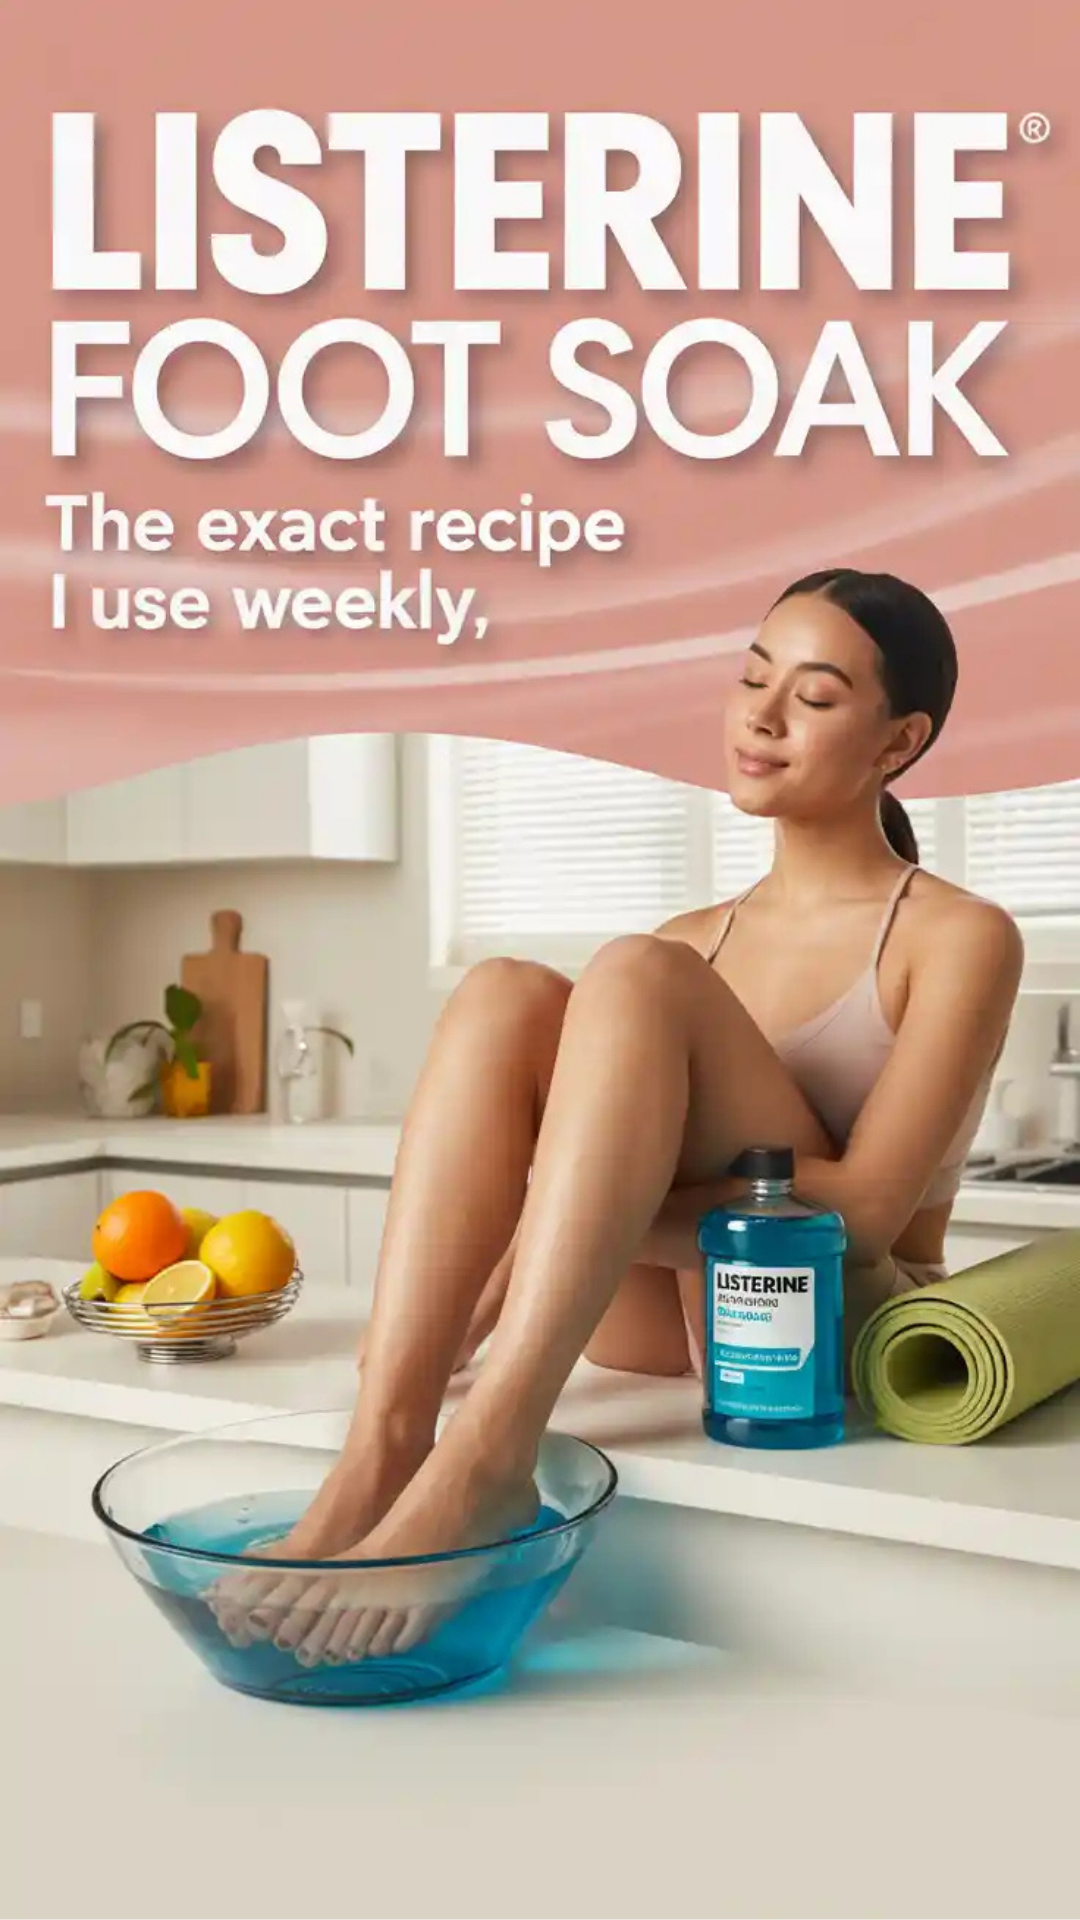
My Listerine foot soak is an easy, natural routine that keeps feet soft, fresh, and calm. Below I share the exact recipe I use weekly, plus safe dilutions, step-by-step instructions, and smart tweaks. Expect smoother heels, less odor, and a relaxing ritual—not miracle cures or harsh scraping.
- Safety first: patch testing, who should skip, and smart limits
- The exact weekly recipe: safe ratios, ingredients, and why it helps
- Step-by-step method: prep, soak, exfoliate, rinse, moisturize
- Results I noticed and realistic expectations you can trust
- Variations and add-ons: odor, rough heels, tired feet, and spa upgrades
- Common mistakes to avoid and easy fixes that protect skin
- When to see a professional and a 14-day trackable plan
Safety first: patch testing, who should skip, and smart limits
Before any foot soak, I make comfort and skin safety the goal. A Listerine foot soak can be soothing for healthy skin, but like any home remedy, it needs smart boundaries to stay gentle and useful.
Who this is generally suitable for
If your feet have intact skin with no open cuts, active infections, or rashes, and you’re not sensitive to essential oils or alcohol, a diluted Listerine soak can help soften roughness, cut sneaker odor, and nudge away flaky skin. It’s a maintenance tool—not a medical treatment.
Who should skip or check first
If you have diabetes, peripheral neuropathy, poor circulation, eczema/psoriasis flares, athlete’s foot, nail fungus, open wounds, cracked/bleeding heels, recent pedicure cuts, or a history of contact dermatitis from fragranced products, talk to a clinician or podiatrist before soaking. When in doubt, choose a plain, lukewarm Epsom-salt soak or stick to gentle cleansing and moisturizer until cleared.
Patch test (takes 2 minutes)
Mix 1 teaspoon Listerine with 4 teaspoons water. Dab a little on the inside of your forearm, let it dry, and wait 24 hours. If redness, itching, or burning appears, skip the Listerine step and use the plain or vinegar-only variations later in this guide.
Temperature and timing rules
Warm, not hot. Hot water strips oils and can cause rebound dryness. I keep soaks to 10–15 minutes (max 20) and use them 1–2 times weekly. More isn’t better; over-soaking can dry or irritate skin—especially with essential oils and alcohol in classic mouthwashes.
What this remedy can and can’t do
It can soften callused areas, loosen dead skin so it lifts more easily, reduce shoe odor, and leave feet feeling refreshed. It won’t cure fungal infections or replace medical care. Be realistic and you’ll love the results.
The exact weekly recipe: safe ratios, ingredients, and why it helps
Here is the precise formula I use week in, week out—balanced to be effective without being harsh.
The base mix (1:1:4, gentle + effective)
- 1 cup Listerine (original or “cool mint” style; avoid whitening formulas)
- 1 cup plain white vinegar or apple cider vinegar (5% acidity)
- 4 cups warm water (about bath-temp, not hot) Optional: ½ cup Epsom salt for a softer feel; it dissolves fast and adds a spa feel without sting. Why this ratio? Listerine brings a light essential-oil/alcohol blend that deodorizes and helps loosen residue. Vinegar’s mild acidity helps dissolve flaky buildup. Warm water dilutes everything to a skin-friendly level and delivers the comfort.
A milder sensitive-skin version (1:1:6)
If you’re cautious or new to the soak, make it: 1 cup Listerine + 1 cup vinegar + 6 cups warm water. You can increase strength later if your skin tolerates it well.
Why these ingredients pair well
Listerine’s menthol, eucalyptol, thymol, and methyl salicylate deliver that clean, cooling feel. Vinegar’s gentle acidity helps lift mineral film and soften dead skin. Warmth improves comfort and softens the stratum corneum so moisturizer penetrates better afterward. The key is dilution; strong isn’t safer or faster.
Step-by-step method: prep, soak, exfoliate, rinse, moisturize
This is the exact routine I follow so the soak does the easy work and I avoid over-scrubbing later.
1) Prep the space (1 minute)
Set a sturdy basin on a nonslip mat, place a towel under it, and keep a second towel, a soft washcloth, and your moisturizer nearby. If you plan gentle filing after, set a fine-grit foot file within reach (no cheese-grater styles).
2) Mix the solution (30 seconds)
Add warm water, Listerine, and vinegar in the 1:1:4 ratio. If using Epsom salt, dissolve it first in the warm water, then add the rest.
3) Soak (10–15 minutes)
Lower feet in, relax, and breathe slowly. If you feel prickly heat, strong tingling, or stinging, pull your feet out and dilute with more warm water. The sensation should be mild and pleasant, not “mint burn.”
4) Gentle lift (2–3 minutes)
While feet are still wet, use a soft washcloth to make small circles over heels and balls of feet. If you choose to file, keep it brief and light—5–10 strokes on very rough spots only. The soak should do most of the work; filing is a finishing touch, not a sanding project.
5) Rinse (30 seconds)
Rinse feet under clean, lukewarm water to remove any lingering mint/vinegar mix. Pat—not rub—until just slightly damp.
6) Seal and protect (1–2 minutes)
Apply a pea-size amount of a thick, fragrance-free moisturizer per foot (urea 10–20%, lactic acid 5–12%, or plain petrolatum all work). For extra smoothing, slip on thin cotton socks for 30–60 minutes to help it sink in. If you’ll be on a slick floor, let the moisturizer absorb first to avoid slipping.
7) Clean the basin (1 minute)
Dump the solution, rinse the basin, and let it air-dry. A clean setup keeps the ritual quick next time.
Timing I stick to
Once weekly is plenty for maintenance. If my heels feel extra rough in winter, I’ll do a second, milder 1:1:6 soak mid-week. I avoid daily soaks to protect the skin barrier.
Results I noticed and realistic expectations you can trust
Here’s what changed for me—quick wins, steady gains, and what didn’t happen (and shouldn’t be expected to).
Immediate effects (Day 1)
- Softer feel on heels and forefoot with minimal effort
- Shoes smell fresher the next day
- Cooling sensation that makes feet feel “lighter”
Short-term changes (Week 1–2)
- Flakes lift faster with a washcloth, so I retired harsh scrubs
- Moisturizer penetrates better; fewer sharp snags on socks/sheets
- I stopped chasing calluses with aggressive tools because I didn’t need to
Medium-term gains (Weeks 3–6)
- Rough patches narrowed to smaller zones
- Maintenance became quick: soak → brief cloth polish → moisturize
- I used less lotion overall because it actually worked after a soak
What it didn’t do
- It didn’t “cure” toenail fungus (it won’t), athlete’s foot, plantar warts, or cracked, bleeding fissures. Those need clinician-guided care. The soak is for comfort, odor, and surface smoothness.
How I measured progress (simple)
I rated heel roughness on a 1–5 scale, noted any snagging on sheets, and tracked how long moisturizing took to feel effective. When those numbers improved and stayed steady, I knew the weekly cadence was right.
Variations and add-ons: odor, rough heels, tired feet, and spa upgrades
Small tweaks keep this ritual adaptable for different seasons and needs—without making it complicated or harsh.
For strong shoe odor
Keep the base 1:1:4 mix and add 1 tablespoon baking soda to the basin to help neutralize odors. After the soak, let shoes air out and sprinkle a teaspoon of baking soda inside each shoe overnight; tap out in the morning.
For rough, winter heels
Use the 1:1:4 mix, then apply a urea 20% cream post-soak and wear cotton socks for 60 minutes. Repeat weekly. On off-days, apply a thin layer of petrolatum at bedtime and sock-occlude for 30 minutes.
For tired, “heavy” feet
Keep the mix mild (1:1:6). Add Epsom salt (½ cup) to the warm water before Listerine/vinegar. Finish with a minute of ankle circles and calf stretches:
- Stand facing a wall, one foot back, heel down, knee straight 20 seconds
- Slightly bend the back knee 20 seconds
- Switch sides
For sensitive skin
Skip vinegar the first week. Try ½ cup Listerine + 6 cups warm water only, 10 minutes max. If that feels good, add ½ cup vinegar the next week, then work toward 1:1:6 as tolerated.
For a “spa night” feel (still gentle)
Add 2–3 thin slices of fresh ginger to the warm water before mixing. The scent is soft and pleasant. Finish with a quick foot massage using a bland, fragrance-free cream—focus on arches and calves.
What not to add
Avoid essential oils, bleach, peroxide, and undiluted acids. They add irritation risk without extra benefit. Keep it simple; your skin barrier will thank you.
Common mistakes to avoid and easy fixes that protect skin
Most mishaps come from “more must be better.” Here’s how I sidestep the usual traps so my feet end up smoother, not mad.
Mistake 1: Soaking too long or too strong
Symptoms: stinging during the soak, tightness or redness after. Fix: dilute to 1:1:6 or 1:1:8 and cap soaks at 10–15 minutes. Moisturize immediately after rinsing and space soaks at least three days apart.
Mistake 2: Scrubbing like you’re sanding wood
Symptoms: tender, shiny patches; more flakes days later. Fix: let the soak do the heavy lifting; use a soft cloth first. If you file, keep it brief and dry the skin fully before the next session. Over-exfoliation invites cracks.
Mistake 3: Doing a soak on cracked or broken skin
Symptoms: burning, delayed healing. Fix: pause soaks. Switch to plain lukewarm water cleansing, protect with a bland ointment, wear socks, and ask a clinician if cracks are deep or worsening.
Mistake 4: Treating infections with a soak
Symptoms: recurring itch, peeling between toes, thick/discolored nails. Fix: see a clinician for athlete’s foot or nail problems. Use the soak for comfort only after treatment is underway and your clinician says it’s okay.
Mistake 5: Skipping moisturizer
Symptoms: “Good tonight, rough tomorrow.” Fix: always seal in water with a thick, fragrance-free cream or petrolatum within two minutes of pat-drying. That’s where the glow comes from.
Mistake 6: Hot water and perfumed extras
Symptoms: tight, flushed skin; prolonged tingling. Fix: warm, not hot. Keep formulas simple and fragrance-light to avoid barrier irritation.
Quick troubleshooting list (pin this)
- Stinging during soak → dilute or shorten time
- No softening → verify ratios; water may be too cool or soak too short
- Odor returns fast → rotate shoes/socks; dry shoes thoroughly; sprinkle baking soda overnight
- Roughness persists → add urea 20% cream post-soak for two weeks before reassessing
- Sensitive between-toes skin → avoid soaking that area; cleanse and dry thoroughly, moisturize only tops/soles
When to see a professional and a 14-day trackable plan
Home care shines for comfort and maintenance, but some signals say “get help.”
Red flags—don’t DIY these
- New or worsening pain, warmth, or redness that spreads
- Swelling, drainage, or foul odor from cracks or around nails
- Fever or feeling unwell
- Sudden numbness, color change, or cold feet
- Deep heel fissures that bleed or won’t close
- Diabetes, neuropathy, or poor circulation with any new foot issue
How a clinician can help
- Diagnose athlete’s foot, contact dermatitis, warts, or nail problems
- Debride thick calluses safely if they’re causing discomfort
- Recommend appropriate medicated creams when needed
- Tailor routines if you have conditions that change skin healing
My 14-day plan (copy this and check boxes)
Days 1–2
- Patch test diluted Listerine (1:4 water on forearm)
- Wash and fully dry shoes/insoles; sprinkle baking soda overnight
- Trim nails straight across; file edges lightly Day 3
- Soak 1:1:4 for 10–15 minutes
- Gentle cloth polish; brief file if needed; rinse; moisturize; cotton socks 30 minutes
- Note heel roughness (1–5), odor, and comfort in a quick log Days 4–6
- No soak; nightly moisturizer; sock-occlude 30 minutes on the roughest spots
- Rotate shoes; keep feet dry between toes Day 7
- Soak 1:1:4 (or 1:1:6 if sensitive) for 10–15 minutes
- Repeat the finish (rinse → moisturize → socks)
- Re-score roughness and comfort Days 8–13
- Maintenance only: moisturizer nightly; quick cloth polish in the shower as needed
- If heels remain stubborn, switch lotion to urea 20% for one week Day 14
- Review scores. If roughness improved ≥1 point and comfort is steady, keep weekly soaks. If not, reduce filing, keep dilution mild, and consider a podiatry visit for guidance.
How I keep it sustainable
I tied the weekly soak to a fixed moment (Sunday night playlist + basin). A routine beats motivation. Since it’s short, it actually happens, and my feet stay photo-ready without drama.
Frequently Asked Questions
Does the Listerine foot soak cure toenail fungus or athlete’s foot?
No. It can freshen and soften skin, but it does not cure fungal infections. See a clinician for targeted treatment. Use the soak later, with permission, for comfort and maintenance.
Is blue or amber Listerine better for the soak?
Either classic, non-whitening mouthwash works. I avoid whitening formulas and overly perfumed variants. If you’re sensitive, start with the sensitive-skin dilution and test.
Do I need the vinegar, or is Listerine alone enough?
Vinegar adds gentle acidity that helps loosen flaky buildup. If you prefer to start simple, try Listerine + warm water (1:6) first, then add vinegar if your skin tolerates it.
How often should I do it?
Once weekly is enough for maintenance. Extra rough heels may benefit from a second, milder mid-week soak for 2–3 weeks, then return to weekly. Daily soaks can over-dry skin—skip them.
Can I soak if my heels are cracked?
If cracks are open or bleeding, skip the Listerine/vinegar mix. Clean with lukewarm water, moisturize generously, protect with socks, and ask a clinician—deep fissures need tailored care.